Page All: Viewing All Pages
Page 1
<B>Intro</B>:
We have system guides, and reviews of stuff, but how do you actually put together this thing we call computers? I'll show you every step of the process. If you're a beginner, you'll want to read this. Even if you are beyond a beginner, consider this a refresher.
<B>Step 1 - Planning</B>:
<center> </center>
Your first step should be to write down what parts you want, or what parts you already have and need. When you start to get all the parts, check them off. When the entire list is complete, time to move on!
<B>Step 2 - Clean out the old parts</B>:
<center> </center>
If you are building a totally new system, you can skip this part. I am reusing a few pieces of hardware and the case. Therefor, you must clean out the old parts, and then actually CLEAN the parts. Dust gets on this stuff fast, and I mean FAST. An air can will do the job.
<B>Step 3 - Lay out all the parts</B>:
<center>
 </center>
You should lay out all the parts, and make sure you have everything you need to make the system. If you don't, go back to the checklist and see what's missing. Don't do something stupid and destroy the boxes that parts came in just yet. You need to test the system. A nice box of screws and a screw driver is also need.
<B>Step 4 - Preinstall some stuff on the motherboard</B>:
<center> </center>
You're next step is to install the CPU and memory on the motherboard before putting the motherboard into the case. This is much easier than doing it later.
<center> </center>
The CPU I'm using is a 2.4C Ghz. You can see the stepping in the pic.
<center> </center>
The motherboard is an Abit IS7-E. The E means cheap (basically). I went with a Springdale board, because it was cheaper, and it is nearly as fast as the more expensive Canterwood.
<center> </center>
Lift up the retention arm on the socket on the motherboard.
<center> </center>
Then drop in the CPU and close the retention arm.
<center> </center>
Put the heatsink on and make it nice and tight. For AMD boards, this is a harder step. The the heatsink has clips that you must install on the socket. The Pentium 4 is much easier. Look at the picture.
<center> </center>
The heatsink will have a wire from the fan that you need to plug in. Look for the CPU FAN header on the motherboard.
<center> </center>
Your next step is to locate the memory sockets. In this case, we need to pair up sticks to get the Dual DDR function working. They are color coded, you should check your manual to see how you should arrange your memory.
<center> </center>
Plop the memory in, and push it hard enough for it to lock in. You might think you're giving to much force, but you probably aren't.
<B>Step 5 - The I/O Shield</B>:
<center>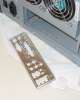 </center>
This stupid metal thing goes in that area you see above. Some of them are really hard to stay in place, but just keep calm, and force it in.
<B>Intro</B>:
We have system guides, and reviews of stuff, but how do you actually put together this thing we call computers? I'll show you every step of the process. If you're a beginner, you'll want to read this. Even if you are beyond a beginner, consider this a refresher.
<B>Step 1 - Planning</B>:
<center>
</center>Your first step should be to write down what parts you want, or what parts you already have and need. When you start to get all the parts, check them off. When the entire list is complete, time to move on!
<B>Step 2 - Clean out the old parts</B>:
<center>
</center>If you are building a totally new system, you can skip this part. I am reusing a few pieces of hardware and the case. Therefor, you must clean out the old parts, and then actually CLEAN the parts. Dust gets on this stuff fast, and I mean FAST. An air can will do the job.
<B>Step 3 - Lay out all the parts</B>:
<center>
</center>You should lay out all the parts, and make sure you have everything you need to make the system. If you don't, go back to the checklist and see what's missing. Don't do something stupid and destroy the boxes that parts came in just yet. You need to test the system. A nice box of screws and a screw driver is also need.
<B>Step 4 - Preinstall some stuff on the motherboard</B>:
<center>
</center>You're next step is to install the CPU and memory on the motherboard before putting the motherboard into the case. This is much easier than doing it later.
<center>
</center>The CPU I'm using is a 2.4C Ghz. You can see the stepping in the pic.
<center>
</center>The motherboard is an Abit IS7-E. The E means cheap (basically). I went with a Springdale board, because it was cheaper, and it is nearly as fast as the more expensive Canterwood.
<center>
</center>Lift up the retention arm on the socket on the motherboard.
<center>
</center>Then drop in the CPU and close the retention arm.
<center>
</center>Put the heatsink on and make it nice and tight. For AMD boards, this is a harder step. The the heatsink has clips that you must install on the socket. The Pentium 4 is much easier. Look at the picture.
<center>
</center>The heatsink will have a wire from the fan that you need to plug in. Look for the CPU FAN header on the motherboard.
<center>
</center>Your next step is to locate the memory sockets. In this case, we need to pair up sticks to get the Dual DDR function working. They are color coded, you should check your manual to see how you should arrange your memory.
<center>
</center>Plop the memory in, and push it hard enough for it to lock in. You might think you're giving to much force, but you probably aren't.
<B>Step 5 - The I/O Shield</B>:
<center>
</center>This stupid metal thing goes in that area you see above. Some of them are really hard to stay in place, but just keep calm, and force it in.
Page 2
<B>Step 6 - Prepare the case</B>:
<center> </center>
Each case is different. Install the needed risers and studs in the case for your particular type of motherboard. Some motherboards may not need all the holes in the case, so don't worry if you aren't using them all.
<B>Step 7 - Drop the board in</B>:
<center> </center>
Line up the motherboard and slide it in. Then screw it down.
<B>Step 8 - Install the extra cards</B>:
<center>
 </center>
Locate the AGP slot and install the video card. Then install any PCI cards you might have in the white slots (well, they should be white). Screw down the cards and hold them in place. Once again, you might need to apply some force.
<B>Step 9 - Install the Drives</B>:
<center>
 </center>
Locate the drive areas, and then install the drives. Screw them on BOTH sides of the case. This is very important to do to cut down on vibration.
<B>Step 10 - Put in the cables</B>:
<center>
 </center>
Install the IDE cables, make sure that the drives are all set in the jumpers. Remember, Blue goes on the motherboard, black goes on master, and grey goes on slave. Simple right?
<B>Step 11 - The little things</B>:
<center> </center>
Those little wires that all cases have need to be installed at a specific locations. Check your manual to find out where to install things like the power switch and the hard drive LED.
<B>Step 12 - Install the power</B>:
<center> </center>
Plug in the ATX connector and the individual drive power connectors. Once you have done this, you should be finished installing the hardware side of the system.
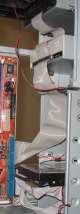
<B>Step 13 - Gaze at the power</B>:
<center> </center>
Rejoice at your new system! Remember, this is hardware only, I'm not covering the next steps of installing software and making sure everything works. Perhaps another guide.
<B>Step 6 - Prepare the case</B>:
<center>
</center>Each case is different. Install the needed risers and studs in the case for your particular type of motherboard. Some motherboards may not need all the holes in the case, so don't worry if you aren't using them all.
<B>Step 7 - Drop the board in</B>:
<center>
</center>Line up the motherboard and slide it in. Then screw it down.
<B>Step 8 - Install the extra cards</B>:
<center>
</center>Locate the AGP slot and install the video card. Then install any PCI cards you might have in the white slots (well, they should be white). Screw down the cards and hold them in place. Once again, you might need to apply some force.
<B>Step 9 - Install the Drives</B>:
<center>
</center>Locate the drive areas, and then install the drives. Screw them on BOTH sides of the case. This is very important to do to cut down on vibration.
<B>Step 10 - Put in the cables</B>:
<center>
</center>Install the IDE cables, make sure that the drives are all set in the jumpers. Remember, Blue goes on the motherboard, black goes on master, and grey goes on slave. Simple right?
<B>Step 11 - The little things</B>:
<center>
</center>Those little wires that all cases have need to be installed at a specific locations. Check your manual to find out where to install things like the power switch and the hard drive LED.
<B>Step 12 - Install the power</B>:
<center>
</center>Plug in the ATX connector and the individual drive power connectors. Once you have done this, you should be finished installing the hardware side of the system.
<B>Step 13 - Gaze at the power</B>:
<center>
</center>Rejoice at your new system! Remember, this is hardware only, I'm not covering the next steps of installing software and making sure everything works. Perhaps another guide.