Page All: Viewing All Pages
Page 1
<b>Intro</b>:
<center>
 </center>
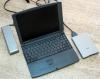
Many of the readers who visit here surely have an older computer that has been tossed away in a closet. Take a look at »my systems. The oldest computer I have is a Pentium 266 MMX laptop with 64MB of RAM. Most people would just consider this to be garbage and junk it, and if you brought this in for service where I work, I would agree with you. While this laptop might seem old and out-of-date now, it is small and light. I needed something I could easily carry around, so I figured I would see what I could salvage out of this dinosaur. Windows would have a hard time running on this low-spec laptop, but there are many distributions of Linux that will work exceptionally well. The one we'll be using today is Damn Small Linux.
<b>Problems</b>:
<center>
 </center>
When you have older technology, you need to cope with multiple problems. These days, almost all PC software is installed off of CD-ROM. What if you don't have a CD drive? (Such is the case on this laptop.) Or, what if you have a CD drive, but your computer doesn't boot from it? I did some research to find a solution to my problem. For Damn Small Linux, you can get around these issues very easily. My laptop has a floppy drive and a USB port. I'm set for installation. If you have a floppy and a CD drive, but the CD doesn't boot, you are fine as well.
<b>Damn Small Linux</b>:
<center> </center>
http://www.damnsmalllinux.org/ You'll want to <a href="http://www.damnsmalllinux.org/download.html">choose the version</a> that fits your needs. If you have a computer that boots off of a CD drive, you can choose the dsl-1.5.iso or dsl-1.5-syslinux.iso. The syslinux is for older computer that need floppy emulation. Most newer computers support EL Torrito standard of CD boot (http://www.phoenix.com/resources/specs-cdrom.pdf (pdf)). Selecting the syslinux version is the safest bet. If you have a CD drive but cannot boot off of it, download the dsl-1.5.iso and download the bootfloppy.img. If you have nothing but a USB port and a floppy drive, download the dsl-1.5.iso and the bootfloppy-usb.img. All of these files are in the current directory. Once you have the files, you need to put them onto a CD and a floppy. Winimage works for the IMG file for the floppy. Use a burning program for the ISO file. If you only have a USB port, you'll need a flash drive and exact the files from the ISO onto the flash drive.
<b>Testing</b>:
To see if DSL will work correctly, you can just run it from the floppy/cd/usb combo and let it boot. It goes into the Live CD mode (it is based on Knoppix after all). If you are satisfied with the results and want a more permanent solution, you can install it to the hard drive with a frugal installation. This type of install takes a boot partition of 50-80MB and any extra space on the hard drive can be used for data, such as swap space and personal backup.
<center> </center>
You may get a kernel panic error like I did. This error was caused because the system couldn't find the Knoppix boot image anywhere even though I had the USB flash drive plugged in. A restart fixed this problem.
<b>Preparation</b>:
My laptop has a 4.3GB drive so I needed to partition it to give an 80MB partition that is bootable (ext2) located in /dev/hda1, a 150MB swap space (type 82! Make sure you select the correct type) located at /dev/hda2 and the rest of the space for my data and backup located at /dev/hda3. These hdxy locations are important to note, since you'll need to mke2fs them in a second. To get to this point, reboot the computer and at the prompt type "dsl 2". The runlevel 2 means text mode. If you had trouble running the Live CD because the resolution is too high (the default is 1024x768) you can prepend "fb800x600" to the prompt to force the resolution to 800x600. The total prompt would be "fb800x600 dsl 2". Here is a picture of cfdisk. All console images have been inversed to make it easier to read.
<center> </center>
Once you have wrote the partition tables to the disk, you need to run four commands to setup the partitions.
mke2fs /dev/hda1
mke2fs /dev/hda3
mkswap /dev/hda2
swapon /dev/hda2
<center> </center>
What? Well, mke2fs (http://www.die.net/doc/linux/man/man8/mke2fs.8.html) makes an ext2/ext3 file system. Slower systems should be using ext2. If you have a speedier system, ext3 with journaling will give you an updated filesystem. mkswap (http://www.die.net/doc/linux/man/man8/mkswap.8.html) makes a swap area. swapon (http://www.die.net/doc/linux/man/man2/swapon.2.html) start swapping. You don't need to have a swap space, but it helps.
At this point restart the system. Theoretically, you don't need to restart. Do this just to be safe. Remember back when everyone and his grandma used DOS? Fdisk anyone?
<b>Intro</b>:
<center>
</center>Many of the readers who visit here surely have an older computer that has been tossed away in a closet. Take a look at »my systems. The oldest computer I have is a Pentium 266 MMX laptop with 64MB of RAM. Most people would just consider this to be garbage and junk it, and if you brought this in for service where I work, I would agree with you. While this laptop might seem old and out-of-date now, it is small and light. I needed something I could easily carry around, so I figured I would see what I could salvage out of this dinosaur. Windows would have a hard time running on this low-spec laptop, but there are many distributions of Linux that will work exceptionally well. The one we'll be using today is Damn Small Linux.
<b>Problems</b>:
<center>
</center>When you have older technology, you need to cope with multiple problems. These days, almost all PC software is installed off of CD-ROM. What if you don't have a CD drive? (Such is the case on this laptop.) Or, what if you have a CD drive, but your computer doesn't boot from it? I did some research to find a solution to my problem. For Damn Small Linux, you can get around these issues very easily. My laptop has a floppy drive and a USB port. I'm set for installation. If you have a floppy and a CD drive, but the CD doesn't boot, you are fine as well.
<b>Damn Small Linux</b>:
<center>
</center>http://www.damnsmalllinux.org/ You'll want to <a href="http://www.damnsmalllinux.org/download.html">choose the version</a> that fits your needs. If you have a computer that boots off of a CD drive, you can choose the dsl-1.5.iso or dsl-1.5-syslinux.iso. The syslinux is for older computer that need floppy emulation. Most newer computers support EL Torrito standard of CD boot (http://www.phoenix.com/resources/specs-cdrom.pdf (pdf)). Selecting the syslinux version is the safest bet. If you have a CD drive but cannot boot off of it, download the dsl-1.5.iso and download the bootfloppy.img. If you have nothing but a USB port and a floppy drive, download the dsl-1.5.iso and the bootfloppy-usb.img. All of these files are in the current directory. Once you have the files, you need to put them onto a CD and a floppy. Winimage works for the IMG file for the floppy. Use a burning program for the ISO file. If you only have a USB port, you'll need a flash drive and exact the files from the ISO onto the flash drive.
<b>Testing</b>:
To see if DSL will work correctly, you can just run it from the floppy/cd/usb combo and let it boot. It goes into the Live CD mode (it is based on Knoppix after all). If you are satisfied with the results and want a more permanent solution, you can install it to the hard drive with a frugal installation. This type of install takes a boot partition of 50-80MB and any extra space on the hard drive can be used for data, such as swap space and personal backup.
<center>
</center>You may get a kernel panic error like I did. This error was caused because the system couldn't find the Knoppix boot image anywhere even though I had the USB flash drive plugged in. A restart fixed this problem.
<b>Preparation</b>:
My laptop has a 4.3GB drive so I needed to partition it to give an 80MB partition that is bootable (ext2) located in /dev/hda1, a 150MB swap space (type 82! Make sure you select the correct type) located at /dev/hda2 and the rest of the space for my data and backup located at /dev/hda3. These hdxy locations are important to note, since you'll need to mke2fs them in a second. To get to this point, reboot the computer and at the prompt type "dsl 2". The runlevel 2 means text mode. If you had trouble running the Live CD because the resolution is too high (the default is 1024x768) you can prepend "fb800x600" to the prompt to force the resolution to 800x600. The total prompt would be "fb800x600 dsl 2". Here is a picture of cfdisk. All console images have been inversed to make it easier to read.
<center>
</center>Once you have wrote the partition tables to the disk, you need to run four commands to setup the partitions.
mke2fs /dev/hda1
mke2fs /dev/hda3
mkswap /dev/hda2
swapon /dev/hda2
<center>
</center>What? Well, mke2fs (http://www.die.net/doc/linux/man/man8/mke2fs.8.html) makes an ext2/ext3 file system. Slower systems should be using ext2. If you have a speedier system, ext3 with journaling will give you an updated filesystem. mkswap (http://www.die.net/doc/linux/man/man8/mkswap.8.html) makes a swap area. swapon (http://www.die.net/doc/linux/man/man2/swapon.2.html) start swapping. You don't need to have a swap space, but it helps.
At this point restart the system. Theoretically, you don't need to restart. Do this just to be safe. Remember back when everyone and his grandma used DOS? Fdisk anyone?
Page 2
<b>Installation</b>:
When you are presented with the boot prompt, type the command you used before to boot DSL. In my case it was "fb800x600 dsl 2". At the bash prompt navigate to the /usr/sbin/ directory. Once you are in that directory type "./frugal_install.sh". You can combine these previous two steps by typing "/usr/sbin/frugal_install.sh" at the bash prompt anywhere. The frugal install process will start and asks a few questions.
<center> </center>
The first question it will ask is where to hold the boot image. Since you have made the partition before hand on hda1, we will use that. Type in 'hda1'. Frugal will ask whether to install the image from a few different media types. This example is using a Virtual PC, but even with my floppy/usb combo on my laptop I had to select Live CD. Just type 'l'. Next question is for extra boot options. We'll put the home, etc, and opt on hda3. Type 'home=hda3 etc=hda3 opt=hda3'. Choose a language. If you are reading this guide, just press enter. At the next prompt type 'y' you would like to specify a default restore partition. Type 'hda3'. You also would like to specify a different partition for myDSL, type 'y'. Next type in 'hda3'. Lastly, all options will be committed and partitions will be formatted and written to. Type 'y' and wait. Once the setup has been completed, let it reboot.
<center> </center>
After the reboot, you should be presented with another setup screen for selecting what type of X server to use. I tried to use Xvesa on my laptop, but it didn't work so I defaulted to Xfbdev because of the age of my laptop. If you opted to put a screen resolution override on the boot before the install, it will carry over into this. The next two screens are for USB/PS2 mice. Select the appropriate option for your system.
<b>Linux</b>:
<center> </center>
After the initial setup and config, you'll be presented with a fully working Linux system as depicted. The default window manager takes some getting used to if you are coming from Windows, but is generally very easy to use. Right click on the desktop to bring up the apps menu. To setup other devices, click the DSLpanel icon. Damn Small Linux had no problems detecting my Prism2 wireless card and once I set it up to use my home network I was browsing with ease. Your setup may be different, you are welcome to »post in the forums here or at <a href="http://damnsmalllinux.org/cgi-bin/forums/ikonboard.cgi">DSL's site</a> for help.
<center> </center>
As shown, my laptop is running at a speedy 266MHz. Even at this speed, DSL runs extremely well. Firefox was nice and speedy as well as general program responsiveness. DSL has a repository of programs for myDSL which is like apt. Click, download and run. DSL is highly customizable and extendable. I am very impressed. »My system specs are listed here.
<b>Grievances</b>:
I have some grievances with DSL that I hope will be fixed in the next version. Wireless cards do not have a decent utility to help with the wireless networking setup. You are forced to know the exact SSID and channel. Even after typing in all the settings, a reboot clears them. Once DSL gets a cleaner wireless config (that shows signal strength and available SSIDs), it will be much better. Second, myDSL programs don't persist past a reboot. Third, the little dock on the right of the screen is a pain to remove. I still couldn't figure it out and I had to edit a config file to stop it from loading. Fourth, 1024x768 should not be the default resolution. 800x600 or even 640x480 should be default. It would even better if DSL could probe the graphics card. These grievances are rather minor but would improve the distribution if fixed.
<b>Conclusion</b>:
My needs for a thin and light laptop for browsing the internet while I was at school was filled with this little project. If you have an older computer sitting at home collecting dust, give DSL a shot and try to put it to good use. DSL runs happily on older hardware, and on newer hardware, it screams. Giving life to a older computer is a great way to learn about other (better) operating systems, and you can let other people try out it as well. DSL and Linux in general have never ceased to amaze me. My webserver runs Linux, my home fileserver/printserver/webserver and one of my laptops now run it. How long before we say goodnight to Windows completely?
PS: I hate activation and DRM. Thanks for reading. »Voice your opinion in the forums.
<b>Installation</b>:
When you are presented with the boot prompt, type the command you used before to boot DSL. In my case it was "fb800x600 dsl 2". At the bash prompt navigate to the /usr/sbin/ directory. Once you are in that directory type "./frugal_install.sh". You can combine these previous two steps by typing "/usr/sbin/frugal_install.sh" at the bash prompt anywhere. The frugal install process will start and asks a few questions.
<center>
</center>The first question it will ask is where to hold the boot image. Since you have made the partition before hand on hda1, we will use that. Type in 'hda1'. Frugal will ask whether to install the image from a few different media types. This example is using a Virtual PC, but even with my floppy/usb combo on my laptop I had to select Live CD. Just type 'l'. Next question is for extra boot options. We'll put the home, etc, and opt on hda3. Type 'home=hda3 etc=hda3 opt=hda3'. Choose a language. If you are reading this guide, just press enter. At the next prompt type 'y' you would like to specify a default restore partition. Type 'hda3'. You also would like to specify a different partition for myDSL, type 'y'. Next type in 'hda3'. Lastly, all options will be committed and partitions will be formatted and written to. Type 'y' and wait. Once the setup has been completed, let it reboot.
<center>
</center>After the reboot, you should be presented with another setup screen for selecting what type of X server to use. I tried to use Xvesa on my laptop, but it didn't work so I defaulted to Xfbdev because of the age of my laptop. If you opted to put a screen resolution override on the boot before the install, it will carry over into this. The next two screens are for USB/PS2 mice. Select the appropriate option for your system.
<b>Linux</b>:
<center>
</center>After the initial setup and config, you'll be presented with a fully working Linux system as depicted. The default window manager takes some getting used to if you are coming from Windows, but is generally very easy to use. Right click on the desktop to bring up the apps menu. To setup other devices, click the DSLpanel icon. Damn Small Linux had no problems detecting my Prism2 wireless card and once I set it up to use my home network I was browsing with ease. Your setup may be different, you are welcome to »post in the forums here or at <a href="http://damnsmalllinux.org/cgi-bin/forums/ikonboard.cgi">DSL's site</a> for help.
<center>
</center>As shown, my laptop is running at a speedy 266MHz. Even at this speed, DSL runs extremely well. Firefox was nice and speedy as well as general program responsiveness. DSL has a repository of programs for myDSL which is like apt. Click, download and run. DSL is highly customizable and extendable. I am very impressed. »My system specs are listed here.
<b>Grievances</b>:
I have some grievances with DSL that I hope will be fixed in the next version. Wireless cards do not have a decent utility to help with the wireless networking setup. You are forced to know the exact SSID and channel. Even after typing in all the settings, a reboot clears them. Once DSL gets a cleaner wireless config (that shows signal strength and available SSIDs), it will be much better. Second, myDSL programs don't persist past a reboot. Third, the little dock on the right of the screen is a pain to remove. I still couldn't figure it out and I had to edit a config file to stop it from loading. Fourth, 1024x768 should not be the default resolution. 800x600 or even 640x480 should be default. It would even better if DSL could probe the graphics card. These grievances are rather minor but would improve the distribution if fixed.
<b>Conclusion</b>:
My needs for a thin and light laptop for browsing the internet while I was at school was filled with this little project. If you have an older computer sitting at home collecting dust, give DSL a shot and try to put it to good use. DSL runs happily on older hardware, and on newer hardware, it screams. Giving life to a older computer is a great way to learn about other (better) operating systems, and you can let other people try out it as well. DSL and Linux in general have never ceased to amaze me. My webserver runs Linux, my home fileserver/printserver/webserver and one of my laptops now run it. How long before we say goodnight to Windows completely?
PS: I hate activation and DRM. Thanks for reading. »Voice your opinion in the forums.